Why do artists refuse to use references why why why.
It’s not a contest to see who can get by without them. It’s not cheating to look at a thing in order to know what the thing looks like.
You don’t get stronger or better by pretending. Nobody is impressed by the awkward whatever-it-is you just drew. Use references.
I don’t think a lot of people know that it’s not cheating. I recall seeing so many piece of art called out because they referenced a pose, someone recognized it, and then proceeded to shame them for it. There’s this belief, both by creators and the audience, that artists should just be able to translate the ideas from their head to paper, and if they don’t, it’s plagiarism, or not true originality (spoiler alert: there’s no such thing).
I myself didn’t start using references until very recently, because even I was under the impression that it was frowned upon. And that belief has seriously crippled and stalled my ability to improve as an artist.
As a restarting artist, I can confirm. I just never knew. I thought you were just supposed to know how to draw the body correctly and if you didn’t you had no talent.
(( I am going to say this again, loud and clear for everyone:
USING REFERENCES FOR ART IS NOT ‘CHEATING’!!!
If you can draw/paint without references, great! But if you need to use them, and feel that your art can be bettered by using references, please, use them! This is one of the biggest tips I can give to artists, is USE REFERENCES!
Anyone who would dare to attack someone for using references after ‘recognizing a pose’ is a dipshit, who doesn’t know a thing about art.
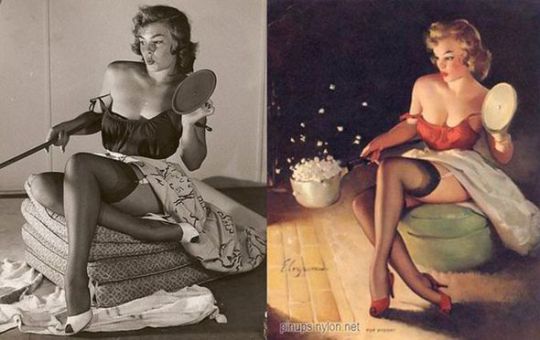
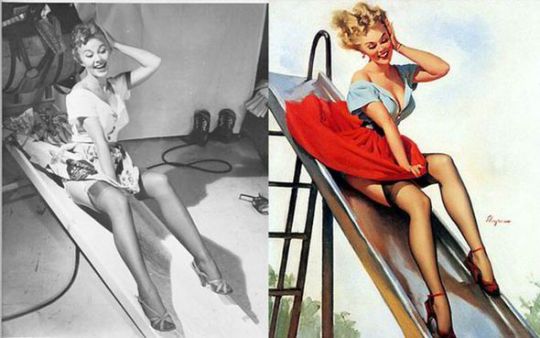
Do you know who else used references for their art?
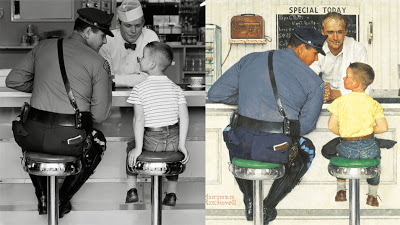
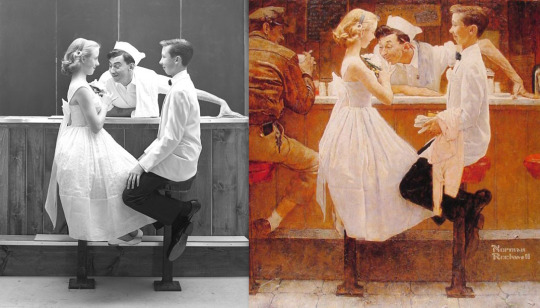
Norman Rockwell
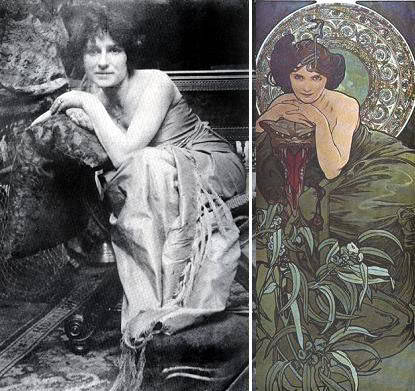
Alphonse Mucha
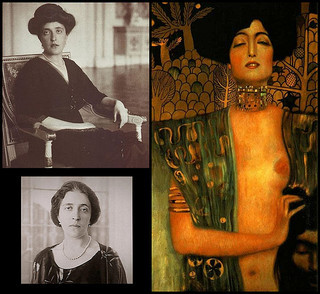
Gustav Klimt
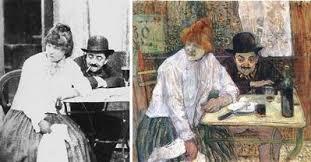
Toulouse Lautrec
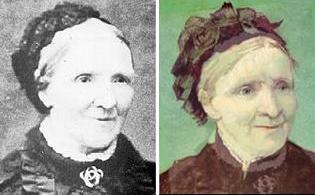
Vincent Van Gogh
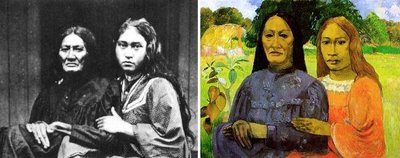
Paul Gauguin
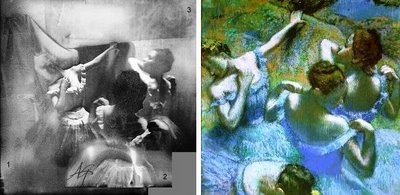
Edgar Degas
Gil Elvgren
Frida Kahlo
Pablo Picasso
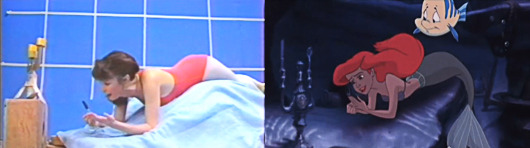
Disney Studios
And thousands of others! So, artists! Go forth, and use references!!! ))
What do you think artists do when they ask someone to stand infron of them for 6 hours and then they draw this person. Do they cheat? Or when they place a still life and then paint it, cheating again? LOL
Soooo. I made this post originally on my personal blog (I’m eliciaforever), and it was nothing more than a little rant about a specific incident that I deleted after five minutes. But before I could delete it, it took the hell off on me, and now it has all these notes. And LOTS OF AMAZING INPUT.
And I just wanted to add in response to the above tags in particular, that shaming people for using references is something that happens to so many of us SO OFTEN. It doesn’t matter how skilled you are. People think art is supposed to be magical or whatever, and anything else is a crime. The reality of course is that art is a thousand times more deliberate than a lot of people think it is.
So yeah. Good info to pass along. Use references, kids. ❤
Reblogging because I think it’s important especially for young artists to gain the confidence to use references.
Seriously, references are esssential! Use them!
I use the fuck out of references because otherwise my stuff looks like HORSE SHIT
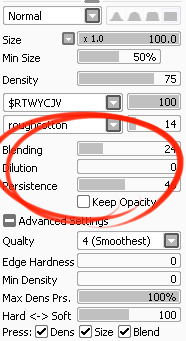
I’ve had a general idea what these things did but wasn’t completely sure what their specific functions were. I decided to sit down and figure it out, and I have thrown together a short reference guide for anyone who is confused about them. I know there are multiple translations of SAI floating around, so if some of these terms don’t sound familiar, just know that I’m talking about the three settings that appear under the texture in the brush tool settings (note that this won’t apply to any tool types except for brushesand watercolor brushes).
I don’t claim to be an expert so if you find I’ve made a mistake, let me know so I can update it, thanks! :3
—-
BLENDING (Color Blending)
This controls how readily the brush will inherit any colors you are painting over with it. For example, a 0% blending setting will pick up no existing colors, treating it as if you were painting on a transparent layer. A 100% blending setting will ONLY pick up existing colors (provided there are any). So at 100%, the color you’re using won’t even show up, unless you move to a transparent area. Blending is not affected by transparent pixels, so if you’re drawing on a blank layer it will have no effect.
So you can see from this example that the color I’m using gets harder to paint as the blending increases and more of the existing green is absorbed, until at 100% it is just completely turning green.
—-
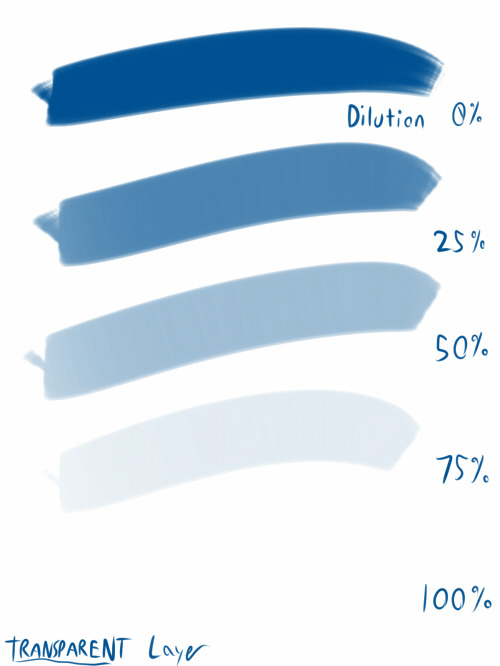
DILUTION (Opacity Mix)
This controls how readily the brush will draw on a blank (transparent) part of the layer. A 0% Dilution will result in the brush painting very easily onto a blank surface, while a brush with 100% dilution will literally not paint on blank parts of the layer at all. Dilution is ONLY affected by transparent pixels. So it won’t do anything if the whole layer is already filled in (even with white). Dilution can be thought of as the inverse of the Blending setting in some ways.
So in this example, you can see that as dilution approaches 100%, the color I’m painting with basically becomes invisible. In fact, if you were to switch to binary color mode and look at this layer, there would literally be nothing there anymore!
Keep this in mind – if you ever can’t paint for some reason, check your dilution setting, it might have gotten accidentally bumped to 100!
—-
PERSISTENCE
This one goes hand-in-hand with blending. Basically, it controls how easily a brush shifts color as you are blending from one color to another. Rather, how long it “persists” if you will. Like blending, Persistence is only really relevant when painting over existing color so it’s mostly unaffected by transparent pixels. Basically, the higher the persistence, the longer it will take for the color to shift as you make a stroke, and subsequently, from which color to which other color it is shifting is dependent on the blending setting.
So for this example I’ve done the same test with three different levels of blending. I turned off all pressure sensitivity (actually I just used my mouse) to emphasize the effects in a controlled environment:
If blending is at 0%, persistence fails to have any real effect. With pressure on, there is only the difference of having to push harder, but the results will be the same as far as I can tell.
At a happy medium of 50%, persistence increase causes the orange that the brush is picking up to last longer as it goes into the green, until it never shifts to blue at all.
At 100% blending, there was never any blue in the first place, because as we already know, full blending causes you to only pick up existing color. So the persistence setting changes only how fast the orange changes to green.
Persistence is dependent upon the blending settings, so having them somewhere in the middle will probably produce the most optimal results.
—-
CONCLUSION
Ultimately how you use these is up to you, and is largely dependent on what kind of brush you’re making and what it will be used for. And most of these settings are meant to be used together in unison, so play around with them a lot!
If you are confused, or not sure what settings you want or what settings you should be using, a safe bet is to put them all at about 50% – that will produce fairly average results that are easy to work with, and it’s easy to remember in case you want to experiment but don’t want to forget your settings in case you decide to switch back.
The external oblique is that muscle that covers the side of the torso (partly on the front and on the sides of the body).
It’s formed by 8 portions per side, each one attached to a rib: the upper fours – thoracic portion – can be seen as four fleshy stripes in hot males muscular figures, while the bottom fours – flankpad portion – are usually perceived as a one thick bulbous shape. The waist stays at the conjunction between thoracic and flankpad portion.
This muscle actually covers the frontal abs too with a super thin kind-of-like cartilaginous surface. Under the flankpads, a ligament goes from the ASIS of the hips down to the front of the pubic bone, with a thicker line that forms a rather visible “V” shape. On women, this fold of the groin is rather curved, while on men is more angular and since it’s extremely sexy, is also called Apollo’s belt (or Adonis’, if you prefer ^^).
The external oblique muscle helps you move your upper body, of course. With the help of other muscles, it lets you flex the vertebral column and bend at the waist to the front; it also assists in lateral flexion (see Cullen stretching down here), or to rotate your torso on the horizontal axis, so with your feet facing forward and your upper body facing sideways (like Ellyna). The muscle’s shape stretches or compresses when doing these movements, of course, so remember it when drawing certain poses. One more thing to notice in Ellyna’s pose is a “tension line” (force?) that goes from the muscles of the neck, through the strenum and down to the pubic bone, and helps describing this twisting movement.
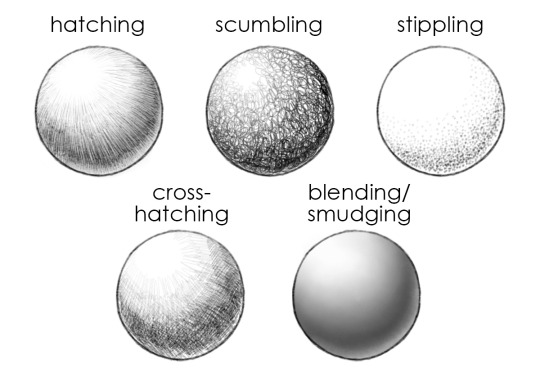
In Lesson Three, we talked about paying attention to light and shadow in shading forms. In this week’s post, we’re going to focus on shading techniques! Specifically, in how we create marks that build up to areas of shadow.
There are a number of different ways to apply drawn media to a page to create value. A few of them are:
Hey! Sorry for the late reply, I haven’t really had time to do the tutorial for you! But, I did one today. It’s kinda messy and not 100% anatomically perfect (I do several flaws myself) but I think I made some good points!
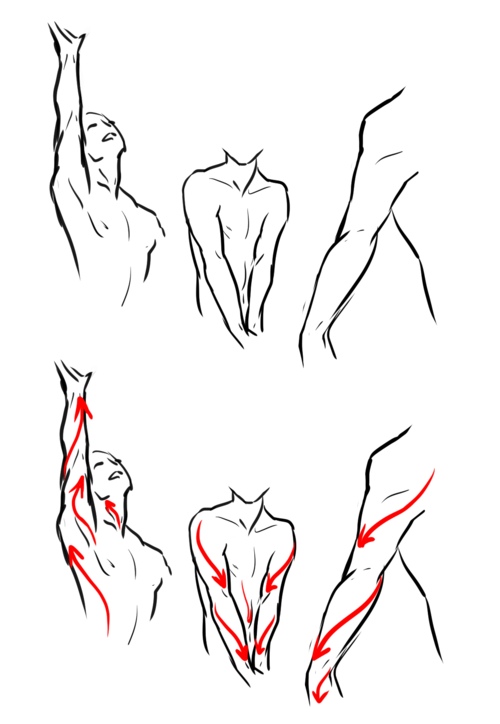
Arms:
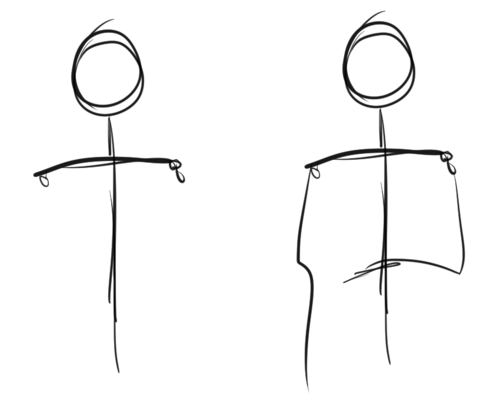
Arms cannot be done without shoulders, so that’s why I will include them here. To know how one body part works, you need to understand the other parts too. I suggest drawing a stick figure, as shown above. Do it with shoulders and everything – don’t care about anatomy. Really, don’t – go mad! You can figure out how to deal with the anatomy AFTER you have figured how to draw the body freely.
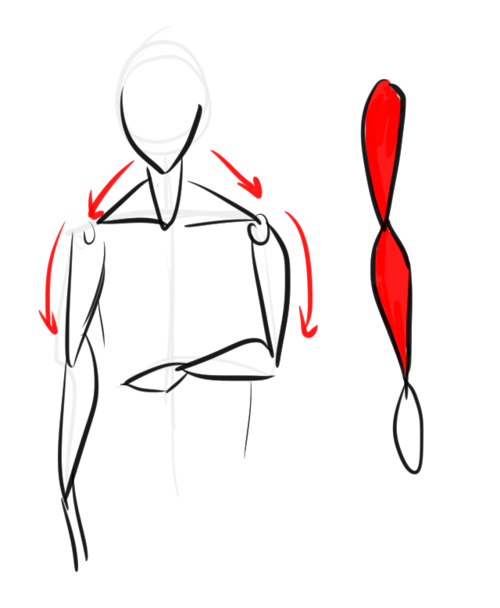
I imagine most body parts to be shaped as tear drops, as shown above; especially the arms and legs. Draw them above the stick figure – don’t be afraid to overlap the teardrops. In fact, I suggest it! The best way to understand anatomy is to think of it as shapes and doll-parts.
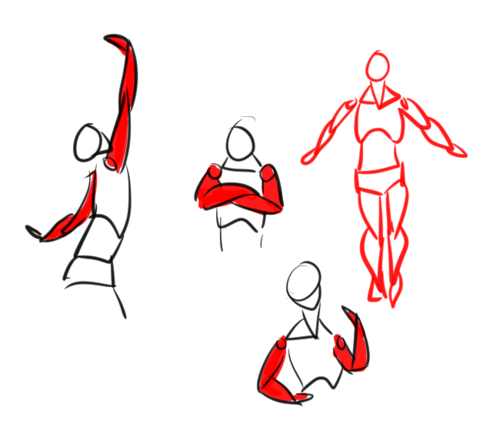
After you’ve figured that out, do several, VERY tiny, small doodles like these. Go crazy – don’t bother with anatomy just yet. Do them also very quickly and so small you can’t think of the details. Just keep doing this until you sorta understand how arms work.
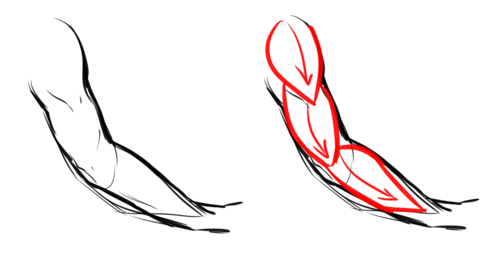
Here is a doodle of a “real” arm, and as you can see, how it’s shaped it resembles the teardrops above. A general rule is to constantly draw the body in curves – male AND female. NEVER draw a single line straight.
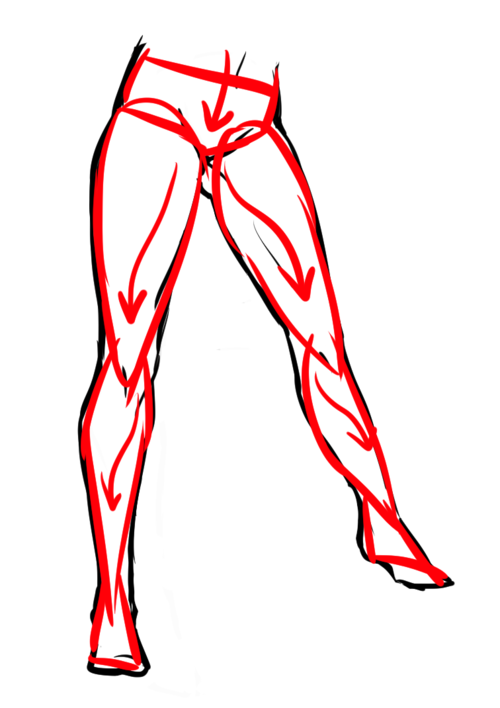
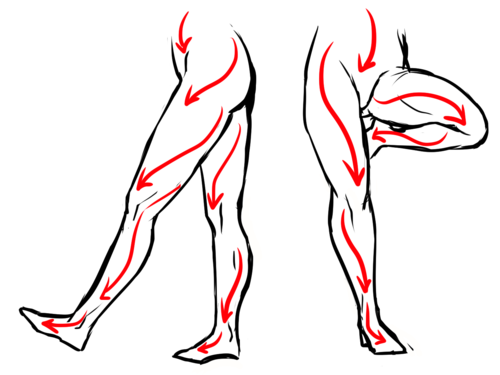
I mentioned before I thought it was important to include shoulders/other body parts to understand another. This is why. The body basically has a “flow” when you move. The red lines clearly shows the flow. This is also how you can create a dynamic pose: think of the flow. The muscles are formed that way to be able to function. Which reminds me, buy some good anatomy books. And I’m talking about more or less MEDICAL anatomy books – you think you won’t need it – but trust me, it’s more useful than you can imagine. I do NOT suggest buying “stylistic” anatomy books, like Christopher Hart (ugh NO), for example, as these can mislead you. Medical anatomy books CANNOT because they MUST be right.
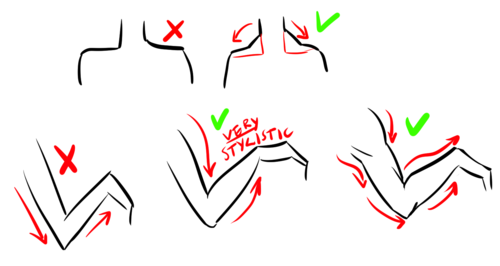
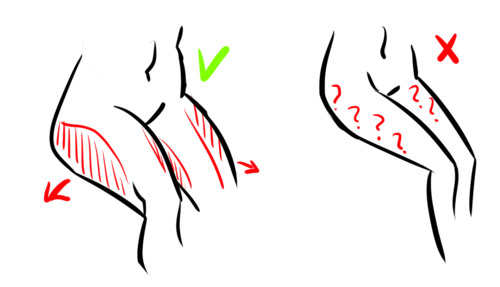
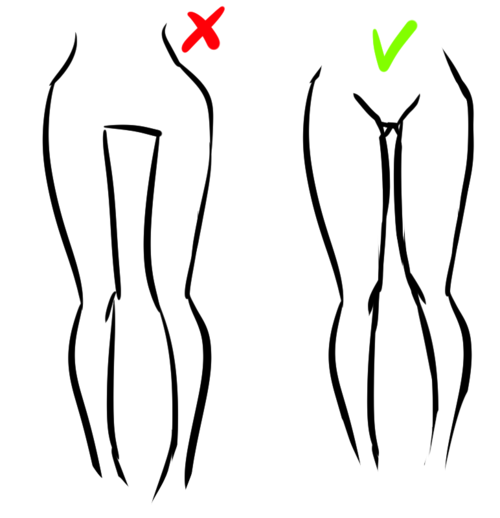
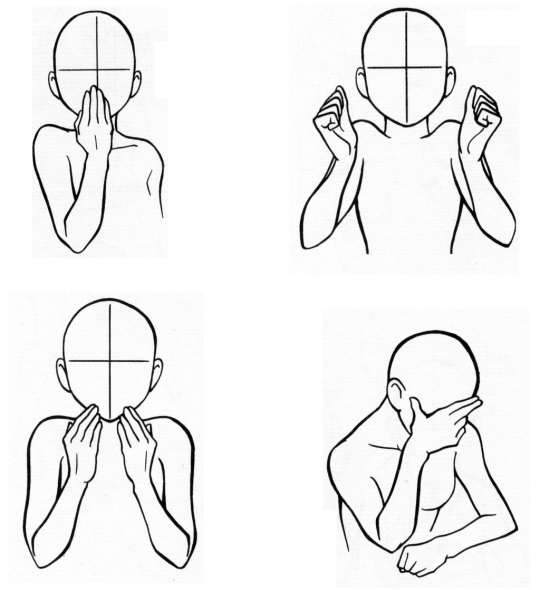
And for the last part, here’s some “do’s” and “don’ts”. It’s important to remember the muscles between the neck and shoulders. Many, especially when drawing females, forget this. It’s true the most visible it is – the more muscular you will look. But even the most petite people have these. Your neck literally would not function if you didn’t have these supporters. Then, the arms below is just to show why it’s important to draw the body with curves. Many have probably heard “straight lines for males” which is a complete lie. They will look stiff and unnatural. Curves can both empathize muscles AND fat. Heck, even your bones aren’t straight.
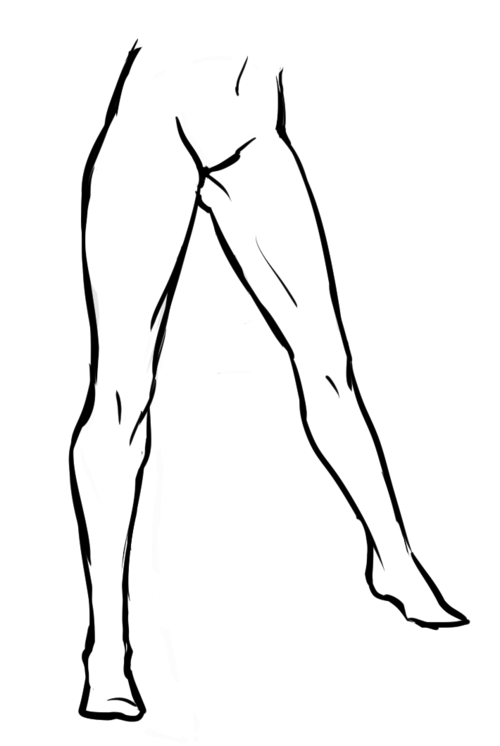
Legs:
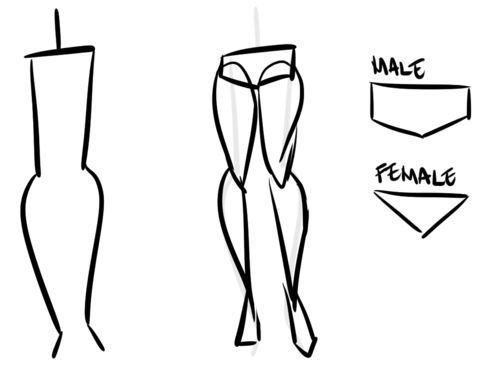
Legs certainly are the hardest. There’s a good reason for this; because they’re one of our most strongest muscles, and they are more or less dominating when it comes to poses (together with the spine). However, just like with the arms, draw a stick figure. I won’t suggest drawing them completely straight, as you can see here, as it will add weight. Do teardrops shapes. As for the hips – think of them as panties or briefs. This is not a MUST; but it will help; I think!
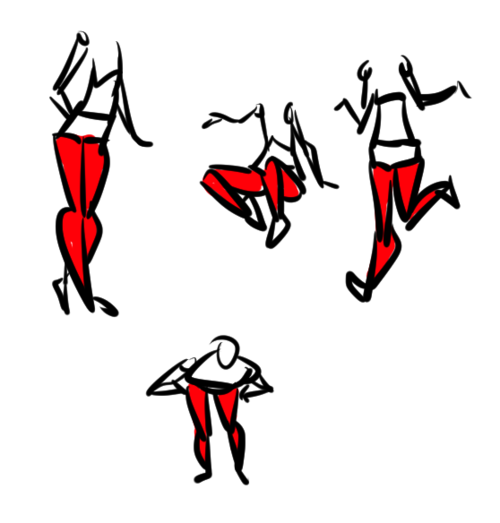
And just like the arms, do small doodles. Don’t be serious, play around until you get the idea.
As you can see, these legs easily can be turned into teardrops even when they’re detailed like this.
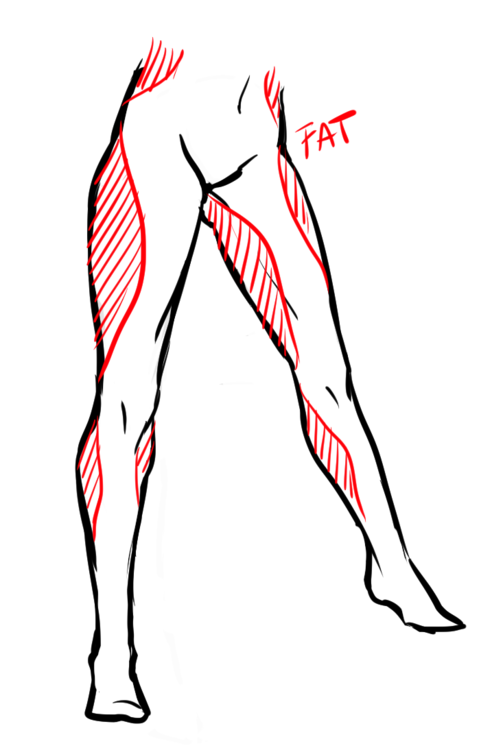
Now, what makes legs/hips interesting is that the way fat gathers there. Although not a must, seeing as we’re all different, females tend to get more fat there than men. Usually, however, it’s not at the SIDE of the hips, but at the thighs, calves and the “love handles”. (Excuse my english, aaah…) Women also tend to have bigger hips, but again, it’s not a must. It’s not uncommon to have small hips, either; or big hips for men, etc.
Of course, the legs too follow the “flow”!
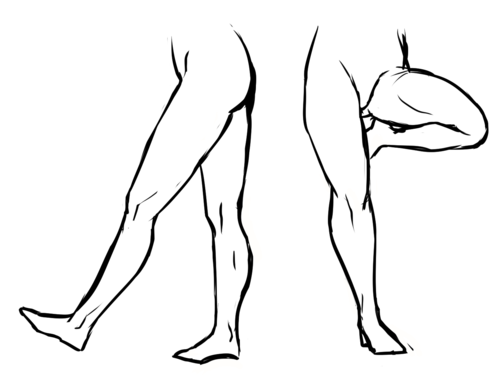
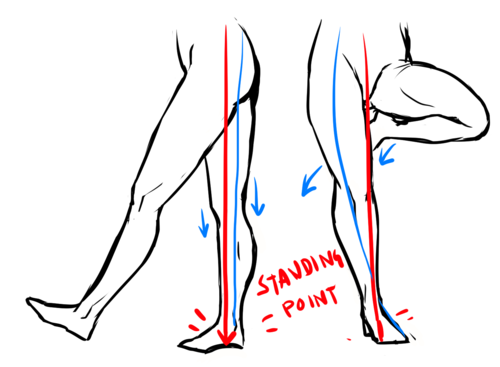
Something worth noting is the “Standing point” The standing point is basically a straight line, and the further away you are from the line; the more unbalanced you are. To create a dynamic pose you should avoid that line as much as possible. However, if you want to look balanced/realistic, have the one leg stand there for support. The leg to the left is balanced, as you can see one of the legs is taking all the weight; with other words, it’s the support leg-making it balanced. The legs to the right, however, are likely to fall over if she keeps standing like that! edit: <- that explanation was horrible. Hope you still get it.
Now for some more do’s and don’ts. I already mentioned the barbie legs, invisible heels and micro-mini crotch in my previous tutorial, but these two are different. I see this mistake a lot; when you sit down, your thighs will become wider because you’re pressing all the fat to the sides. Now, this also depends on how you’re positioning your legs. How much it widens depends on how much fat you have in the first place; but it will always be there.
And then there’s this awkward “thigh gap”. Before I get any haters telling me how I “thin shame”, please, take a seat and read this. Good? Good. How much space you actually have between your thighs depends fully on how you’re standing, bending, angle, body type and everything else. However, the one to the left? Not likely.
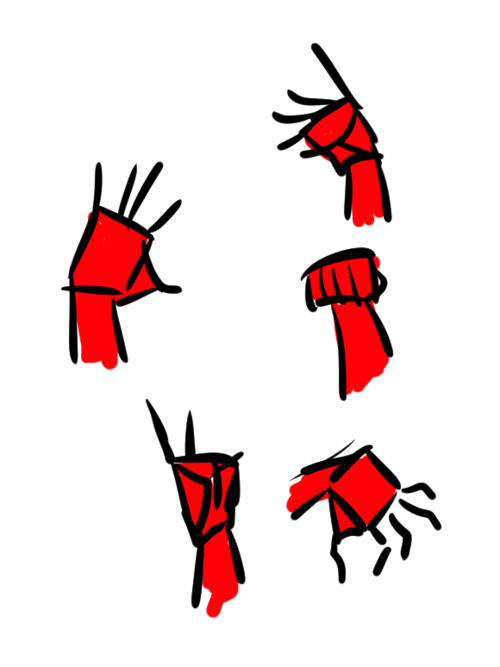
Hands:
– Okay, I’m getting really lazy now; so I’ll be quick. Draw a rectangle. Sorta like this; it doesn’t have to be exactly like this – since hands can be shaped VERY differently. Just compare to your friends.
– Draw a little triangle attached to it.
– Now, the fingers! How long they should be and etc doesn’t really matter either. But if you’re unsure, draw them as tear drops, too.
– Now, flesh out the fingers! Starting to look like a hand, sort of.
– Then draw the details and fix things you didn’t like. I really don’t like the way this is drawn but I’m just tired right now.
Just like the legs/arms, practice by doing that simple figure really quickly.
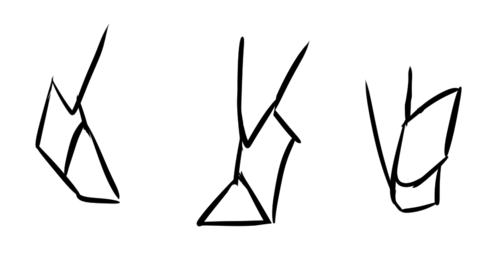
Feet:
Okay, I’m getting really lazy. Plus, feet are SUPER HARD- I’m just going to say this: think of them as triangles. Overlap them; think of it as 3D!
Practice practice practice! And medical anatomy books. And photo references. And real-life references!
Hope this helped! o/ As I said, I’m nowhere near perfect but, ahh, I tried.
Here’s some of the most amazing and invaluable advice you’ll most-likely ever get from one of my good colleagues and legends in comics/gaming, creator JOE MADUREIRA. It’s what i’ve been preaching to you aspiring artists since i arrived on DA, but i think his POV says it perfectly:
*WARNING: SOME MATURE LANGUAGE*
“DO YOU REALLY WANT TO BE A SUCCESSFUL ARTIST?
Or a successful WORKING PROFESSIONAL?
Believe it or not there is a difference. I’m not usually a soapbox type guy, I don’t like instructing people, and I think I’m a terrible teacher. But hey, it’s Friday and I’m in a strange mood. So here goes:
I’ve noticed that a good number of my fans happen to be aspiring artists themselves. This is for all you guys. I get asked constantly: “Where should I go to school?”“What classes should I take?”“What should I study for anatomy?”“What pencils and paper do you use?”“Should I be working digitally now instead of traditionally?”“How do I fix my poses? Learn composition? Perspective?”“When am I going to develop my own style?” “Who were your influences?”“Teach me how to draw hands!” The list goes on…
Here’s the deal. All of that stuff *is* important, and it may nudge you in the right direction. A lot of it you will discover for yourself.What works best for one person doesn’t work for another. That’s the beauty of art. It’s personal. It’s discovery. DON’T WORRY ABOUT ALL THAT CRAP!
Instead I’m going to answer the questions that you *SHOULD* be asking, but aren’t. These are things that have only recently occurred to me, after doing this for 20+ years. These things seem so obvious, but apparently they elude a lot of people, because I am surprised at how many ridiculously talented artists are ‘failing’ professionally. Or just unhappy. The beauty of what I’m about to tell you is that it doesn’t matter what field you’re in or what your art style is.
In no particular order:
1)DO WHAT YOU LOVE. If you are passionate about what you’re doing, it shows. If you’re having fun, it shows. If you’re bored, IT SHOWS. Some guys are able to work on stuff they have zero interest in, and still pull off great work, but I find that when I do this my motivation takes a huge hit. And Motivation is key. Money is not a great motivator. It’s temporary like everything else. And honestly, I’ve gotten paid the most money for some of the shittiest work I have ever done. That may sound awesome, but it’s not. And here’s why…
2) You MUST stay Excited and Motivated. Have you noticed that there are days you can’t draw a god damned thing? And some days you feel like you can draw anything? It’s 4am but you don’t notice because you are in the ZONE. Your hand is racing ahead of your mind and you can do no wrong?! Maybe it’s some new paper you got. Or a new program you’ve been wanting to try out. Or you just found some amazing shit on DeviantArt, or watched some movie that just makes you want to run straight to your board. This relates to the above because while it is possible to involve yourself in projects you aren’t excited about—maybe you need the cash, or think it will look good on your resume, whatever it is—it’s not going to last. You need to stay fresh. Expose yourself to new things. New techniques. You should be getting tired of your own shit on a fairly regular basis. Otherwise other people will.
3) Check your Ego. If you think you’re the shit, you’re already doomed. You may be really, really good at what you do, but there’s someone better. Sorry. There’s always plenty to learn, even for us old dogs. So when I meet young upstarts who have this sense of entitlement, or a know-it-all attitude, I just have to laugh. Some of the biggest egos I’ve ever witnessed were from people who have accomplished the least. Meanwhile, most guys who are supremely talented AND successful, and have EARNED the RIGHT to have an ego and throw their weight around, don’t. Why is that? It’s because…
4) RELATIONSHIPS ARE IMPORTANT. This may be one of the biggest lessons I’ve had to learn. Early on, I didn’t value my relationships with people. Creatively or otherwise. I felt like I didn’t need anyone’s help and I could figure everything out on my own. Let’s face it, many of us become artists because we are reclusive, social misfits. We’d rather stay inside and draw shit than go outside and play. We like to live inside our own minds. Why not?! It’s awesome in there! And sometimes we don’t want to let other people in. But like I said—you can’t do it alone. I can honestly say that as much as I try to stay current, as much as I try to push my work and draw kick ass shit that will excite people, I would not be where I am today if it weren’t for all the other people I’ve met and learned from along the way. Guys who pulled strings for me. Took risks on me. Believed I was the right guy for the job. You need to manage your relationships.You need to network, and meet people. Drawing comics is still a pretty good place for reclusive types—but if you want to work in big studios—Making games, Films, animation, basically any other type of job on the planet, you’d better start making some connections. Be likeable. Be professional.That doesn’t mean be an opportunistic ladder climber. Fake people lose in the end. Be yourself, but be professional. It’s no secret that when people are hiring, our first instinct is to bring in people we know. It’s human nature. I don’t like unknowns, even if their portfolio is awesome. If we have a mutual connection, if they have great things to say about you, you’re in. If you have AMAZING artwork to show, and I call your last employer and they tell me what a pain in the ass you are to work with, you’re done.Talent and skill only get you so far. I am literally amazed at how often I meet guys that are total assholes and think they are going to get anywhere.
5) Here’s the BIG ONE.The greatest obstacle you will ever have to overcome IS YOURSELF. And the Fear that you are creating in your own head. Stay positive. Stop defeating yourself. There are artists I know that are so damn good they make me pee my pants. I look up to these mofos. I study their shit and I want to draw like them. And they are almost NEVER working on their DREAM project. And—big surprise, they aren’t happy in their job. “Why NOT?! WTF is WRONG WITH YOU?!” is usually my reaction. And the answer is almost always “The market isn’t great right now”“Other stories/games/comics like mine don’t do very well”“The shit that’s hot right now is nothing like mine, It’s just going to fail.”“I’m not sure I’m good enough.”“I need the money.”“Too Risky.”“I tried it before and failed. ” It doesn’t matter what words they use, they are afraid for one reason or another. I know. I’ve been there.
But here’s the deal. YOU NEED TO TAKE RISKS. Guess what? YOU ARE MOST LIKELY GOING TO FAIL. If you want it—REALLYwant it, that won’t stop you. You will learn A LOT. My good friend Tim constantly jokes about how I jump out of planes without a parachute and worry about the landing on the way down. You may think that I’m lucky, that it’s easy for me to say because I’m already successful, that I’m in a different situation than you all are. But it’s not true. Risk is risk, no matter what level you’re at. If you’re already successful, you just take even bigger risks. But they never go away. Everything in life is Risk vs. Reward. Not just in your career. LIFE. You’d better get used to it.
I didn’t know what the hell I was doing when I got into comics. I left the #1 selling book at the time ( Uncanny X-men ) to work on Battle Chasers during a time when ‘Conan’ was about the only fantasy comic people knew. And no one was buying it. I wanted to work in games, so I started a game company. I had NO IDEA WTF I was doing. I just wanted it, really bad. We tanked. It failed. No big surprise. But the people I worked with got hired elsewhere and rehired me. I started ANOTHER game Company. We had 4 people and a dream, and some publishers wouldn’t even meet with us, because their ‘next gen console’ teams had 90+ people on them. I literally got hung up on. “Stick to handheld games, it’s smaller, maybe you can handle that…” one MAJOR publisher told us. I don’t blame them. But we didn’t let it stop us. Thank god we didn’t listen to them. Vigil was born. Darksiders happened, AND we got to make a sequel. It stands shoulder to shoulder with the best games in the industry, and the most elite and experienced game dev studios in the world. How is that possible?!!! Hardly any of us had even worked on a console game before. I’ll be honest, I was thinking we would fail the whole time. I just didn’t care. If I had to play the odds on this one, I’d bet against us.
Why am I telling you all this shit? This is not me patting myself on the back. It’s just stuff that has somehow only dawned on me recently when it’s been staring me in the face for so long. I feel like I need to wake you guys up!!! I’ve been limiting myself.I’ve gotten afraid.I’ve taken less risks. I saw my career going places I didn’t want to go. I wasn’t happy and I wasn’t excited. And I’ve realized, that all that stuff I just talked about is the reason I am where I am today. Not because I have a manga style, or I draw cool hands, or there’s energy in my drawings, or all the other things people rattle off to me. There are other guys that do all that same shit, and do it better. And amazingly, those same guys constantly tell me “Man, I wish I could do what you are doing.” “SO DO IT!!!!!” PLEASE listen to me—because I want you guys to make it. I want to look to one of you people for inspiration some day when it’s 2am and I need to keep drawing. Stop worrying about all the other stuff—the pencils, the paper, the anatomy, all that shit. It will only get you so far. You’ve already got most of what you need. I hope this helps some people. From the bottom of my heart, thank you for all the support over the years. You are all one of the greatest motivating forces in my life and my career. Sappy but true. Ok, let’s go draw some shit!!!“